
The cost to Texture a Ceiling starts at $1.24 - $1.50 per square foot, but can vary significantly with site conditions and options. Get fair costs for your SPECIFIC project requirements. See typical tasks and time to texture a ceiling, along with per unit costs and material requirements. See professionally prepared estimates for ceiling texturing work. The Homewyse ceiling texturing. After I repaired the failing tape joint at the giant vaulted ceiling drywall seam, I was ready to apply an all purpose joint compound to match the knockdown texture on this drywall tape repair using the knockdown texture sponge by the Texture Master, a 6″ drywall taping knife, 14″ mud pan and a 24″ acrylic knockdown paddle.
Perk up underwhelming walls and ceilings with one of three popular, DIY-friendly dimensional looks.
The knockdown drywall finish, an early 1990s successor to popcorn and orange peel textures, has remained a hit with homeowners for its impressive appearance and practicality. The look is achieved by spraying, troweling, or rolling drywall joint compound onto walls or ceilings to achieve stalactite-like peaks, then flattening the peaks with a knockdown knife. The resulting mottled, naturalistic texture adds dimensional visual impact while also handily hiding any surface imperfections. As a bonus, the treatment helps to mute sounds.
The incredible diaries of Michael Oros outline his thoughts, actions, and reactions throughout his 13-year descent into madness. Michael Oros' confiscated diaries, with entries faithfully kept right to the time an Royal Canadian Mounted Police (RCMP) bullet The tangled path of a crazed fugitive leads through the wilds, the courts, and eventually ends on the final trail. Descent into madness. If Descent into Madness isn’t on the battlefield when its ability resolves, use the number of counters on it when it left the battlefield to determine how many permanents and/or cards from hands to exile.
Another part of the appeal? DIYers armed with basic drywall skills and some affordable tools and materials can create the look with ease! Read on for an overview of the knockdown texture technique, plus step-by-step guidance on pulling off the most popular type of this finish, to achieve a knockout effect in your home.
Photo: flickr.com via bradleypjohnson
Three Types of Texture
There are three main types of knockdown texture—splatter, stomp, and mud trowel—each with a distinct look and requiring unique tools and techniques.
- Splatter: The most popular knockdown texture, splatter has the classic look of Spanish lace stucco—an intricate pattern of splotches inspired by lace veils. It’s achieved by first spraying the surface using a drywall hopper gun (available at home centers; approximately $13 for a half-day rental) loaded with either pre-mixed wet drywall mud or joint compound powder mixed with water. The peaks that form are then flattened with an 18-inch or wider knockdown knife ($15 to $20) to achieve a low-profile raised texture that covers 40 percent of the surface (the other 60 percent remaining flat). The application can be a bit messy, particularly when spraying a ceiling (due to downward splashback). And because a drywall hopper gun is required, this technique requires more initial setup time than stomp and mud trowel, but once you’re good to go the application will prove to be quick, uniform, and less tiring. You can splatter a small surface in as little as an hour or complete a larger area in about one day.
- Stomp: The most prominently textured look of the three, stomp features a higher elevation off the surface than splatter or mud trowel. It’s created by thinning pre-mixed or ready-to-mix drywall mud with water and then applying it to a wall or ceiling using a paint roller. Next, a stiff-bristled crows-foot brush ($8 to $20) is stomped into the mud and, to finish, the mud is flattened with a standard knockdown knife, leaving a finger-like texture on 60 percent or more of the surface. Because drywall is initially applied by roller to fully cover the surface, and an additional step of stomping is required before knockdown, the entire process can take about twice as long as splatter.
- Mud trowel: Also called skip trowel, this technique provides a flatter, more subtle look than splatter or stomp. It’s achieved by applying drywall mud using an 18-inch or wider curved-blade drywall trowel ($25 to $30), then skimming the mudded area again with the cleaned trowel. The curved trowel causes the mud to literally skip across the wall or ceiling, leaving a sparse texture of round, quarter-sized globules on 50 percent of the surface. Hand troweling takes patience, making this technique more time-consuming than splatter.
How to Apply Knockdown Texture
Use this procedure to create splatter knockdown texture, the popular pick for most homeowners. While our instructions include info on mixing drywall joint compound powder, you can skip Step 4 and use pre-mixed wet drywall mud just as well.
TOOLS AND MATERIALS Available on Amazon
– Tarp
– Masking tape
– Spackling compound
– Fine-grit sandpaper (150-grit or higher)
– Drywall hopper gun kit
– Air hose
– Air compressor (minimum capacity of 30 to 40 psi)
– 1.5-gallon joint compound powder (not rapid dry)
– 6-inch drywall knife
– 2-gallon bucket
– Power drill with paddle attachment
– Scrap of drywall (for testing)
– 18-inch knockdown knife
– Rag
Advertisement
STEP 1: Prep the space.
Clear furniture from the room and lay tarp on the floor. Remove wall-mounted light fixtures and hangings and apply masking tape to electrical covers, baseboards, and wall or ceiling joists to protect against overspray.
STEP 2: Smooth the surface.
Knockdown texture can be applied to either bare or painted drywall as long as the surface is blemish-free. To prepare the surface, don protective gloves and goggles and apply the spackling compound to divots or cracks. Dry the compound according to the package instructions, then sand with fine-grit sandpaper.
STEP 3: Assemble the gun.
Secure the hopper (basin) onto the top of the drywall hopper gun, then attach the gun assembly and air hose to the air compressor. Attach the spray nozzle to the gun—a nozzle measuring eight to 12 millimeters is ideal for knockdown textures.
STEP 4: Mix the drywall joint compound.
Choose an un-aggregated drywall joint compound powder (avoiding rapid-set varieties, which dry too fast for the knockdown technique). Fill a two-gallon bucket with two inches of plain cold or room-temperature water, then add 1.5 gallons of drywall joint compound powder and mix using a power drill with a paddle attachment (view example on Amazon) until the mud is lump-free.
STEP 5: Test the mud.
Scoop up a scant amount of mud with a small drywall knife, then tilt the knife to a 30-degree angle. If the mud slides off easily, it’s reached the proper thin consistency; if not, add more water, mix, and test again. Let the mud sit for 15 minutes to absorb the water completely. Then lightly stir with the drill once more.
When your mud is the consistency of pancake batter, pour it into the hopper.
Photo: istockphoto.com
STEP 6: Select your optimal spraying speed.
Plug the air compressor into a grounded wall outlet, open the air valve, and turn the compressor on, setting the pressure to 30 to 40 psi. Spray mud onto a sheet of scrap drywall from at least 18 inches away, using an even, continuous motion. As you test, settle on a spraying speed that provides the texture weight you want. The slower you spray, the heavier and more pronounced the texture; a rapid spray will result in a thinner, lighter texture.
STEP 7: Splatter the surface.
Once you’ve perfected your technique, squeeze the trigger of the drywall hopper gun to splatter the intended wall or ceiling in three-foot sections from a distance of roughly 18 inches away.
Tip: Enable the gun’s trigger lock feature to continuously spray without having to manually maintain pressure on the trigger.
Advertisement
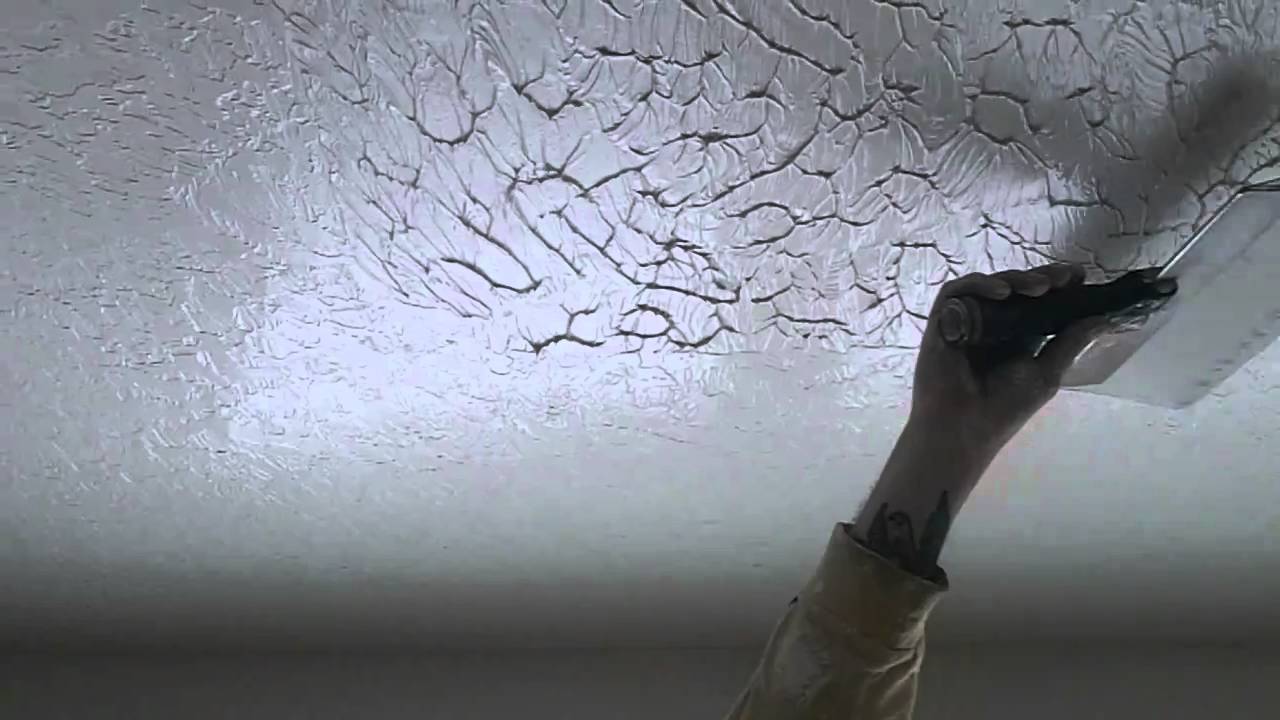
STEP 8: Do the knockdown.
Let each three-foot section dry just long enough to lose its wet shine—roughly 10 to 15 minutes. Attach the knockdown knife to an extension pole and then glide the edge in a single, straight line down the surface. Your goal is to simply flatten the peaks in the wall texture, not smooth it out so much as to erase it. Wipe the edge of the drywall knife with a water-dampened rag.
STEP 9: Alternate splatter and knockdown.
Repeat this process, alternating between applying mud and knocking down the texture, in three-foot sections until you’ve covered the intended area. When finished, close the compressor’s air valve, then turn off and unplug the unit.
STEP 10: Let dry and finish.
Allow the drywall mud dry completely according to manufacturer’s instructions, anywhere from a few hours to overnight, before removing the masking tape and tarp and returning wall hangings and light fixtures. If you plan to paint the knockdown texture, wait several days to a week following before priming and painting.
Keep Knockdown Looking Nice!
- Dust the surface weekly with either an electrostatic duster or a vacuum with a soft brush attachment. Never use abrasive scrub brushes or broom heads, which could slough off the texture.
- To remove grime and stains, saturate a paint roller with a solution of one teaspoon liquid dish soap and four cups warm water. Gently go over the dirty areas, then use a clean, damp roller to remove soap solution residue and make a final pass with a dry roller or soft sponge.
- Drywall compound can take on smoke and soot stains over time, so avoid smoking and limit the frequency of fireplace fires near the textured surfaces.
- Author: admin
- Category: Category
The cost to Texture a Ceiling starts at $1.24 - $1.50 per square foot, but can vary significantly with site conditions and options. Get fair costs for your SPECIFIC project requirements. See typical tasks and time to texture a ceiling, along with per unit costs and material requirements. See professionally prepared estimates for ceiling texturing work. The Homewyse ceiling texturing. After I repaired the failing tape joint at the giant vaulted ceiling drywall seam, I was ready to apply an all purpose joint compound to match the knockdown texture on this drywall tape repair using the knockdown texture sponge by the Texture Master, a 6″ drywall taping knife, 14″ mud pan and a 24″ acrylic knockdown paddle.
Perk up underwhelming walls and ceilings with one of three popular, DIY-friendly dimensional looks.
The knockdown drywall finish, an early 1990s successor to popcorn and orange peel textures, has remained a hit with homeowners for its impressive appearance and practicality. The look is achieved by spraying, troweling, or rolling drywall joint compound onto walls or ceilings to achieve stalactite-like peaks, then flattening the peaks with a knockdown knife. The resulting mottled, naturalistic texture adds dimensional visual impact while also handily hiding any surface imperfections. As a bonus, the treatment helps to mute sounds.
The incredible diaries of Michael Oros outline his thoughts, actions, and reactions throughout his 13-year descent into madness. Michael Oros' confiscated diaries, with entries faithfully kept right to the time an Royal Canadian Mounted Police (RCMP) bullet The tangled path of a crazed fugitive leads through the wilds, the courts, and eventually ends on the final trail. Descent into madness. If Descent into Madness isn’t on the battlefield when its ability resolves, use the number of counters on it when it left the battlefield to determine how many permanents and/or cards from hands to exile.
Another part of the appeal? DIYers armed with basic drywall skills and some affordable tools and materials can create the look with ease! Read on for an overview of the knockdown texture technique, plus step-by-step guidance on pulling off the most popular type of this finish, to achieve a knockout effect in your home.
Photo: flickr.com via bradleypjohnson
Three Types of Texture
There are three main types of knockdown texture—splatter, stomp, and mud trowel—each with a distinct look and requiring unique tools and techniques.
- Splatter: The most popular knockdown texture, splatter has the classic look of Spanish lace stucco—an intricate pattern of splotches inspired by lace veils. It’s achieved by first spraying the surface using a drywall hopper gun (available at home centers; approximately $13 for a half-day rental) loaded with either pre-mixed wet drywall mud or joint compound powder mixed with water. The peaks that form are then flattened with an 18-inch or wider knockdown knife ($15 to $20) to achieve a low-profile raised texture that covers 40 percent of the surface (the other 60 percent remaining flat). The application can be a bit messy, particularly when spraying a ceiling (due to downward splashback). And because a drywall hopper gun is required, this technique requires more initial setup time than stomp and mud trowel, but once you’re good to go the application will prove to be quick, uniform, and less tiring. You can splatter a small surface in as little as an hour or complete a larger area in about one day.
- Stomp: The most prominently textured look of the three, stomp features a higher elevation off the surface than splatter or mud trowel. It’s created by thinning pre-mixed or ready-to-mix drywall mud with water and then applying it to a wall or ceiling using a paint roller. Next, a stiff-bristled crows-foot brush ($8 to $20) is stomped into the mud and, to finish, the mud is flattened with a standard knockdown knife, leaving a finger-like texture on 60 percent or more of the surface. Because drywall is initially applied by roller to fully cover the surface, and an additional step of stomping is required before knockdown, the entire process can take about twice as long as splatter.
- Mud trowel: Also called skip trowel, this technique provides a flatter, more subtle look than splatter or stomp. It’s achieved by applying drywall mud using an 18-inch or wider curved-blade drywall trowel ($25 to $30), then skimming the mudded area again with the cleaned trowel. The curved trowel causes the mud to literally skip across the wall or ceiling, leaving a sparse texture of round, quarter-sized globules on 50 percent of the surface. Hand troweling takes patience, making this technique more time-consuming than splatter.
How to Apply Knockdown Texture
Use this procedure to create splatter knockdown texture, the popular pick for most homeowners. While our instructions include info on mixing drywall joint compound powder, you can skip Step 4 and use pre-mixed wet drywall mud just as well.
TOOLS AND MATERIALS Available on Amazon
– Tarp
– Masking tape
– Spackling compound
– Fine-grit sandpaper (150-grit or higher)
– Drywall hopper gun kit
– Air hose
– Air compressor (minimum capacity of 30 to 40 psi)
– 1.5-gallon joint compound powder (not rapid dry)
– 6-inch drywall knife
– 2-gallon bucket
– Power drill with paddle attachment
– Scrap of drywall (for testing)
– 18-inch knockdown knife
– Rag
Advertisement
STEP 1: Prep the space.
Clear furniture from the room and lay tarp on the floor. Remove wall-mounted light fixtures and hangings and apply masking tape to electrical covers, baseboards, and wall or ceiling joists to protect against overspray.
STEP 2: Smooth the surface.
Knockdown texture can be applied to either bare or painted drywall as long as the surface is blemish-free. To prepare the surface, don protective gloves and goggles and apply the spackling compound to divots or cracks. Dry the compound according to the package instructions, then sand with fine-grit sandpaper.
STEP 3: Assemble the gun.
Secure the hopper (basin) onto the top of the drywall hopper gun, then attach the gun assembly and air hose to the air compressor. Attach the spray nozzle to the gun—a nozzle measuring eight to 12 millimeters is ideal for knockdown textures.
STEP 4: Mix the drywall joint compound.
Choose an un-aggregated drywall joint compound powder (avoiding rapid-set varieties, which dry too fast for the knockdown technique). Fill a two-gallon bucket with two inches of plain cold or room-temperature water, then add 1.5 gallons of drywall joint compound powder and mix using a power drill with a paddle attachment (view example on Amazon) until the mud is lump-free.
STEP 5: Test the mud.
Scoop up a scant amount of mud with a small drywall knife, then tilt the knife to a 30-degree angle. If the mud slides off easily, it’s reached the proper thin consistency; if not, add more water, mix, and test again. Let the mud sit for 15 minutes to absorb the water completely. Then lightly stir with the drill once more.
When your mud is the consistency of pancake batter, pour it into the hopper.
Photo: istockphoto.com
STEP 6: Select your optimal spraying speed.
Plug the air compressor into a grounded wall outlet, open the air valve, and turn the compressor on, setting the pressure to 30 to 40 psi. Spray mud onto a sheet of scrap drywall from at least 18 inches away, using an even, continuous motion. As you test, settle on a spraying speed that provides the texture weight you want. The slower you spray, the heavier and more pronounced the texture; a rapid spray will result in a thinner, lighter texture.
STEP 7: Splatter the surface.
Once you’ve perfected your technique, squeeze the trigger of the drywall hopper gun to splatter the intended wall or ceiling in three-foot sections from a distance of roughly 18 inches away.
Tip: Enable the gun’s trigger lock feature to continuously spray without having to manually maintain pressure on the trigger.
Advertisement
STEP 8: Do the knockdown.
Let each three-foot section dry just long enough to lose its wet shine—roughly 10 to 15 minutes. Attach the knockdown knife to an extension pole and then glide the edge in a single, straight line down the surface. Your goal is to simply flatten the peaks in the wall texture, not smooth it out so much as to erase it. Wipe the edge of the drywall knife with a water-dampened rag.
STEP 9: Alternate splatter and knockdown.
Repeat this process, alternating between applying mud and knocking down the texture, in three-foot sections until you’ve covered the intended area. When finished, close the compressor’s air valve, then turn off and unplug the unit.
STEP 10: Let dry and finish.
Allow the drywall mud dry completely according to manufacturer’s instructions, anywhere from a few hours to overnight, before removing the masking tape and tarp and returning wall hangings and light fixtures. If you plan to paint the knockdown texture, wait several days to a week following before priming and painting.
Keep Knockdown Looking Nice!
- Dust the surface weekly with either an electrostatic duster or a vacuum with a soft brush attachment. Never use abrasive scrub brushes or broom heads, which could slough off the texture.
- To remove grime and stains, saturate a paint roller with a solution of one teaspoon liquid dish soap and four cups warm water. Gently go over the dirty areas, then use a clean, damp roller to remove soap solution residue and make a final pass with a dry roller or soft sponge.
- Drywall compound can take on smoke and soot stains over time, so avoid smoking and limit the frequency of fireplace fires near the textured surfaces.